Hi everyone,
I have sold my Mini and will stop posting on this page.
Thanks for your visit and encouragement all these while!
Friday, March 25, 2011
Saturday, November 1, 2008
Pedal..Power... !
Mini's pedal is kinda small and slippery. (Especially when the rubbers are worn out)

I found this set of Metal Pedals in Thye Huat Bukit Jambul. The size is just nice for the mini as the mini's pedals, especially the throttle is tiny.
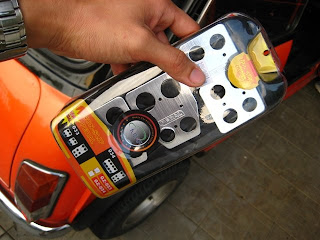

Installing it is easy. Just screw them on the original rubbers.

DONE !


Wednesday, October 29, 2008
The Mini Manual
Finally, the book had arrived... Actually, I kinda downloaded the PDF version of the book and got it printed and bind. The result was fantastic !!


Got it done at quite a cheap price from a friend's uncle. Now I can refer to the guides and info without booting up my PC !
Wednesday, October 22, 2008
Classic Mini Buyers Guide
Quoted from : http://www.itsamini.co.uk/check.htm
What to look for when buying a Classic / Old Style Mini This is a insiders guide on what to look for when buying a classic Mini, as cute as they are,the classic Mini does like to rust.
Outside Bodywork
Firstly look at the scuttle, this is the area under the windscreen where the wipers reside, if this area is rusty it can be replaced, the panel alone is around £70.00, but remember to replace this panel the wings need to be cut off, so that starts getting expensive. Next the front panel, this is below the headlights and often corrodes excessively, again welded on as are all Mini panels so again not cheap to replace. The bonnet is a bolt on panel so nothing too difficult to replace.
What it should look like

Here is an image of the front scuttle where it meets the front wing, this image is taken on a car that is totally original, note the lack of corrosion and how the wing meets the scuttle.
What it shouldn't look like

Note in this image, the panel joint between the wing and scuttle is totally smoothed over. This is a sure fire guarantee that filler has been used, also note the over spray on the side strips. This is the sort of car to be avoided unless it is very cheap
Next the A panels, these A shaped little panels reside between the wings and doors again a favourite rust spot. So if the Mini you are looking at needs all these panels replaced this we would class as a restoration project depending on the severity of the corrosion. Remember paint bubbling means rust underneath. If is for you to decide how bad the rust has advanced and can you live with it. Many people want there Mini as near pristine as possible. But if you have access to a mig welder or a friend that can weld this can de a distinct advantage!


Note the rust on these A panels above
Doors - do they fit correctly?, are the hinges worn?, if the door skin is rusty that can be replaced, but if the frame is rusted you need to consider new doors. Again not cheap.
Rear wings - again not a expensive panel to buy but a major job to replace, in our experience these are normally not too bad.
Boot - a bolt on panel, so no issues there, but look under the rear bumper at the valance to check for rust.
Most of above is cosmetic and will not effect you during an MOT test unless its really excessive. Cheaper cars i.e. under £1,000 will invariably have rust in some or all of these areas
Inside the car
Lift all carpets up to see if the front and rear floors are rusted, check the inner sills, either pull away the carpet or tap with a light metallic object. Be careful here, any rust inside is usually an MOT failure issue. Rear compartments next to the rear seats, lift up the cardboard liners, that must be rust free in side as it is part of the inner sill section.
Inside the Boot
The subframe mounts are in here, so be vigilant, check the boot floor in total, paying attention to the top shock absorber mounts, any corrosion here is expensive to repair and dangerous. Check the boot floor at the rear near the boot lip, also where the subframe bolts to the boot floor. Lastly remove the battery to check the battery box.
This is the area exposed of the boot floor once the petrol tank is removed. Note how close the corrosion is to the two silver bolts that connect the subframe to the boot floor. This will most certainly fail any MOT. This was not an old Mini either - this image was from a 1996 P registered Mini Cooper 1.3i that had covered just 27,000 miles! This to repair properly and neatly is not a cheap exercise!
Underside Front Section
Jack up the front of the car and remove both road wheels, check for corrosion near the front shockers, again an MOT failure, prod around the top of the inner wing where the fresh air vent pipe enters the car, both sides, excessive rust here will guarantee water leaks. Now check where the front subframe mounts to the floor, rust here again is very dangerous. Also check the front subframe, but usually these are OK as most Minis leak oil as standard.
Underside - Sides
Yes its time to check the sills, not dear to buy but still expensive to get fitted correctly and neatly, also check the floor pans for rust.
Underside - Rear
Have a prod in the inner wheel arch, at the top where the shocker mounts and the areas in front and behind the road wheel. Next the rear subframe, if that is corroded that can be a fairly horrendous task to replace and expensive.
Paintwork
Check for colour match and overspray inside door shuts and under wheel arches. If the car you are looking at shows the paint is bubbling the panel is starting to rust, whatever the seller says!
-----------------
Wow.. thank God the Mini that I got was in almost tip top conditions for all these....
What to look for when buying a Classic / Old Style Mini This is a insiders guide on what to look for when buying a classic Mini, as cute as they are,the classic Mini does like to rust.
Outside Bodywork
Firstly look at the scuttle, this is the area under the windscreen where the wipers reside, if this area is rusty it can be replaced, the panel alone is around £70.00, but remember to replace this panel the wings need to be cut off, so that starts getting expensive. Next the front panel, this is below the headlights and often corrodes excessively, again welded on as are all Mini panels so again not cheap to replace. The bonnet is a bolt on panel so nothing too difficult to replace.
What it should look like
Here is an image of the front scuttle where it meets the front wing, this image is taken on a car that is totally original, note the lack of corrosion and how the wing meets the scuttle.
What it shouldn't look like
Note in this image, the panel joint between the wing and scuttle is totally smoothed over. This is a sure fire guarantee that filler has been used, also note the over spray on the side strips. This is the sort of car to be avoided unless it is very cheap
Next the A panels, these A shaped little panels reside between the wings and doors again a favourite rust spot. So if the Mini you are looking at needs all these panels replaced this we would class as a restoration project depending on the severity of the corrosion. Remember paint bubbling means rust underneath. If is for you to decide how bad the rust has advanced and can you live with it. Many people want there Mini as near pristine as possible. But if you have access to a mig welder or a friend that can weld this can de a distinct advantage!
Note the rust on these A panels above
Doors - do they fit correctly?, are the hinges worn?, if the door skin is rusty that can be replaced, but if the frame is rusted you need to consider new doors. Again not cheap.
Rear wings - again not a expensive panel to buy but a major job to replace, in our experience these are normally not too bad.
Boot - a bolt on panel, so no issues there, but look under the rear bumper at the valance to check for rust.
Most of above is cosmetic and will not effect you during an MOT test unless its really excessive. Cheaper cars i.e. under £1,000 will invariably have rust in some or all of these areas
Inside the car
Lift all carpets up to see if the front and rear floors are rusted, check the inner sills, either pull away the carpet or tap with a light metallic object. Be careful here, any rust inside is usually an MOT failure issue. Rear compartments next to the rear seats, lift up the cardboard liners, that must be rust free in side as it is part of the inner sill section.
Inside the Boot
The subframe mounts are in here, so be vigilant, check the boot floor in total, paying attention to the top shock absorber mounts, any corrosion here is expensive to repair and dangerous. Check the boot floor at the rear near the boot lip, also where the subframe bolts to the boot floor. Lastly remove the battery to check the battery box.
This is the area exposed of the boot floor once the petrol tank is removed. Note how close the corrosion is to the two silver bolts that connect the subframe to the boot floor. This will most certainly fail any MOT. This was not an old Mini either - this image was from a 1996 P registered Mini Cooper 1.3i that had covered just 27,000 miles! This to repair properly and neatly is not a cheap exercise!
Underside Front Section
Jack up the front of the car and remove both road wheels, check for corrosion near the front shockers, again an MOT failure, prod around the top of the inner wing where the fresh air vent pipe enters the car, both sides, excessive rust here will guarantee water leaks. Now check where the front subframe mounts to the floor, rust here again is very dangerous. Also check the front subframe, but usually these are OK as most Minis leak oil as standard.
Underside - Sides
Yes its time to check the sills, not dear to buy but still expensive to get fitted correctly and neatly, also check the floor pans for rust.
Underside - Rear
Have a prod in the inner wheel arch, at the top where the shocker mounts and the areas in front and behind the road wheel. Next the rear subframe, if that is corroded that can be a fairly horrendous task to replace and expensive.
Paintwork
Check for colour match and overspray inside door shuts and under wheel arches. If the car you are looking at shows the paint is bubbling the panel is starting to rust, whatever the seller says!
-----------------
Wow.. thank God the Mini that I got was in almost tip top conditions for all these....
Amazing Mini Videos - YouTube
Some amazing videos I found on youtube featuring Minis... Added them here to share to all of you. Enjoy
Amazing Parking Skill
Mini Cooper 4WD R/C
Mini "Italian Job" Stunts (Russ Swift drives Team 21's Italian Job Mini at IOM TT 2007)
Mini Monster Mods ! (Car Sponsorships CS Client Paul Ireson & his 1975 mini's)
The Italian Job - Full Mini Chase scenes
Subscribe to:
Posts (Atom)

